

 الرئيسية
 البوابة
 أحدث الصور
 التسجيل
 دخول
دخولكيف تصنع طائرة من كوب قهوة ؟؟ Paper coffee cup flying & controlled models of hovercrafts
3 مشترك
منتديات العلم والعلماء والمخترعين والمبتكرين .... :: منتدي الإختراعات والإبتكارات Inventions and innovations
صفحة 1 من اصل 1

كيف تصنع طائرة من كوب قهوة ؟؟ Paper coffee cup flying & controlled models of hovercrafts
من طرف المدير العام الأربعاء يونيو 23, 2010 4:18 am
Paper coffee cup flying & controlled models of hovercrafts
كيف تصنع طائرة من كوب قهوة ؟؟

step 1Materials & tools
We will need:
- a paper cup
- 1 sheet of A4 (or similar size) paper weight 160-250 g/m2
(you can also use the lid from the children's shoe boxes or foam trays for vegetables)
- a toothpick
- a segment-edge cutter
- 9V battery (or similar size block)
- an adhesive tape
- scissors
- 1 permament marker (not nessesary)
- a hair dryer (not nessesary)
- computer printer (only if you do not have trays or cardboard lid)

Materials & tools
image not found
loading...
i
step 2Cutting of paper cup
To build a model hovercraft will need about 25mm wide rings cut from the cup. This can be done using the knife and the battery (as well as photographs 2 and 3). If necessary, you can improve the scissors.
To cut a cover of the cockpit, you can issue the cards 9x9cm bent in half diagonally (photo 4). After drawing on the cup (photo 5), we cut out the element of scissors (photo 6). If we do not like the original decoration of the cup, we can painted over - for example, using a permanent marker (photo 7).


As I wrote earlier, for this model of hovercraft, you can use ready-made items that will be the deck.
However, if we do not have the relevant deck, can be made from scratch.
For this purpose, you can use a drawing no 1 (photo or independently to prepare their drawing with own shape.
The difficulty is to build a rigid, not twisted, solid hull, with the corresponding hole.


After carefully gluing (or matching) the deck, we can proceed to assembly. All the elements of constituent shows the photograph no 9. Propeller of paper (from the same cup) is attached to the toothpick (but can also be glued to the ends of the ring).
Final assembly


For our model raised on a cushion (we assume that a well-made) simply blow (simply the mouth or better hairdryer) to the hole on board. It is very important that the airflow was directed straight down, otherwise the model will flee. This requires some training! ;o) If you can disconnect the heat in an hair dryer, will be even better. "Professionals" fly this model with great precision in any direction - flying over obstacles up to 2-3 mm.

step 6Foam deck, crew and finding centre of gravity
Although I'm loving models with cardboard, I must admit that much easier to made a deck of this model with the vegetable trays - also is lighter and thus we can add driver lego. But beware! Adding load, you have to do with the weight! For the balancing we can use crayons or felt-tip pens (photo 13) and few lego block (then we can stick it from the bottom of the deck).


step 7Application
For many years I use those nice models (with great success!) in the classroom, at outdoor workshops and even at international fairs modeling (during the workshop and presentation of model club). Young engineers is really like it!
I have a request - please send me a similar, but your pictures )
)
Application

step 8More modifications and tips
If you liked these models, you can do next, more difficult with moving propellers, superstructures and sack apron, using inspiration in figures 3 and 4 (we've already built this!).
If outlet of your hair dryer is oval - you can use it to turning your model in place. Simply, if the inlet of hovercraft you do slightly oval!
Have a lot of fun!


كيف تصنع طائرة من كوب قهوة ؟؟
step 1Materials & tools
We will need:
- a paper cup
- 1 sheet of A4 (or similar size) paper weight 160-250 g/m2
(you can also use the lid from the children's shoe boxes or foam trays for vegetables)
- a toothpick
- a segment-edge cutter
- 9V battery (or similar size block)
- an adhesive tape
- scissors
- 1 permament marker (not nessesary)
- a hair dryer (not nessesary)
- computer printer (only if you do not have trays or cardboard lid)
Materials & tools
image not found
loading...
i
step 2Cutting of paper cup
To build a model hovercraft will need about 25mm wide rings cut from the cup. This can be done using the knife and the battery (as well as photographs 2 and 3). If necessary, you can improve the scissors.
To cut a cover of the cockpit, you can issue the cards 9x9cm bent in half diagonally (photo 4). After drawing on the cup (photo 5), we cut out the element of scissors (photo 6). If we do not like the original decoration of the cup, we can painted over - for example, using a permanent marker (photo 7).
As I wrote earlier, for this model of hovercraft, you can use ready-made items that will be the deck.
However, if we do not have the relevant deck, can be made from scratch.
For this purpose, you can use a drawing no 1 (photo
The difficulty is to build a rigid, not twisted, solid hull, with the corresponding hole.
After carefully gluing (or matching) the deck, we can proceed to assembly. All the elements of constituent shows the photograph no 9. Propeller of paper (from the same cup) is attached to the toothpick (but can also be glued to the ends of the ring).
Final assembly
For our model raised on a cushion (we assume that a well-made) simply blow (simply the mouth or better hairdryer) to the hole on board. It is very important that the airflow was directed straight down, otherwise the model will flee. This requires some training! ;o) If you can disconnect the heat in an hair dryer, will be even better. "Professionals" fly this model with great precision in any direction - flying over obstacles up to 2-3 mm.
step 6Foam deck, crew and finding centre of gravity
Although I'm loving models with cardboard, I must admit that much easier to made a deck of this model with the vegetable trays - also is lighter and thus we can add driver lego. But beware! Adding load, you have to do with the weight! For the balancing we can use crayons or felt-tip pens (photo 13) and few lego block (then we can stick it from the bottom of the deck).
step 7Application
For many years I use those nice models (with great success!) in the classroom, at outdoor workshops and even at international fairs modeling (during the workshop and presentation of model club). Young engineers is really like it!
I have a request - please send me a similar, but your pictures
Application
step 8More modifications and tips
If you liked these models, you can do next, more difficult with moving propellers, superstructures and sack apron, using inspiration in figures 3 and 4 (we've already built this!).
If outlet of your hair dryer is oval - you can use it to turning your model in place. Simply, if the inlet of hovercraft you do slightly oval!
Have a lot of fun!

المدير العام- عضو ممتاز

-

.....
الباحث عن الحقيقة

.....

****************************

---------------------------------------

----------------------------------------
عدد الرسائل : 4202
العمر : 65
العمل : باحث وكاتب في العلوم ومقارنة الآديان
تاريخ التسجيل : 13/08/2008 -

رد: كيف تصنع طائرة من كوب قهوة ؟؟ Paper coffee cup flying & controlled models of hovercrafts
من طرف شيم الخميس أكتوبر 07, 2010 8:17 pm
اشكرك بعمق وقوة هل يمكن ترسل لي في بريدي الالكتروني تجارب خاصة بالربوتات البسيطة والطيران لطلاب المدارس جزاك الله خير
شيم- عدد الرسائل : 2
العمر : 39
العمل : معلم
تاريخ التسجيل : 07/10/2010
رد: كيف تصنع طائرة من كوب قهوة ؟؟ Paper coffee cup flying & controlled models of hovercrafts
من طرف المدير العام الجمعة أكتوبر 08, 2010 8:51 pm
roSix Legged Walking Robot
Overview
Take the Taymiya six legged walker robot and make a larger version of it. Ultimately I’m deciding if I want to make a bot large enough that two people can ride and drive in.
See (rpantaleo [ندعوك للتسجيل في المنتدى أو التعريف بنفسك لمعاينة هذا الرابط] for a large version of this kind of bot.
One thing I wanted to determine is that if you increase the size of the robot, how it behaves compared to the original. The Taymiya bot is I have to admit pretty lame when it comes to a practical walker. I wanted to see how a larger bot behaved. Another important data point I was looking is – increasing the size makes for a VERY long robot very quickly and not practical for a very large version of the bot that could fit through the side gate in the back yard and still carry two people in some manner.
Once this is complete the next version I plan on doing is seeing what happens if I shorten the distance between the legs (shorten the length of the bot), how does it behave. Of course I could do all this in a CAD program but I’ve gone low tech on this and did it all with pencil and paper and just building it to find out.
I originally set out to do this without having to weld anything. But when it came to making the linkage arms to an exact length and the crank arm I punted and ended up silver soldering these components. I’m sure If I thought about it longer I would of came up with a solution but total build time was an important driver in all of this and I wanted to complete this quickly before it became yet another half completed project cluttering up the garage.
I also chose to use a hand held controller wired to the bot in similar to what comes with the model. I could of easily used spare RC parts but I chose to keep with the spirit of the original and going back to my original theme of using this as a proof of concept I chose to keep it simple.
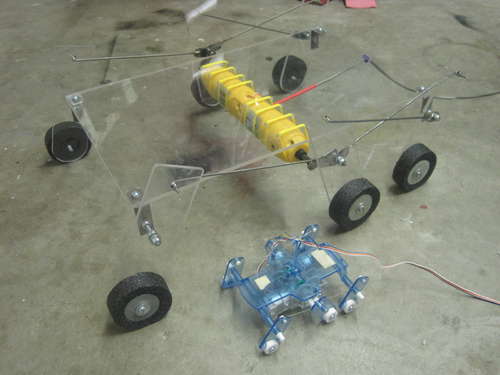
Six Legged Walking Robot
image not found
loading...
This picture makes the bot look like it has wheels! But you can see how much bigger - 4x bigger - than the original
r570sv
i
step 1Design
So futzing with the dimensions of the robot I wanted to keep the size to something that I could build on the work bench. Also I was planning on using some very inexpensive 3.6V electric screwdriver motors for the project so any overall size I came up with had to be within the capabilities of the screwdriver motors to drive it. After crunching some numbers and eyeballing things I chose to make mine 4x times larger than the original.
So what I did is - as best as I could, using a pair of dial calipers – was to measure all of the lengths of all of the components. Then I measured them all again, then I measured them all again. My measurements I believe are close but not 100% accurate. Since I was eye-balling some what I did is take two or three measurements of the same item and averaged the lengths. Some of the easier measurements I did multiple times I ended up with the same distance. For anything that was off, I was wondering what would happen when I multiply the inaccuracy – would the legs bind, would it fall over or not walk at all.
Design

I measured at least 3 times to make sure I was as accurate as I could be. Any error was going to be magnified 4x times on the new bot.
r570sv
i
IMG_1084.JPGIMG_1076.JPGIMG_1075.JPG
step 2Making
Making the base
Making the base only required drilling the holes for the tie wraps to hold the motors in place and the four holes for the leg brackets. Pretty straight forward.
Making the Legs
For the legs I cut six lengths of 2” wide Plexiglas to a length slightly longer than the overall leg (6.320). In the first leg I drilled three holes per my measurements. One for connecting rod, one for the axle center & one hole that is a center point for a 1” radius that would be the center point for the bottom of the foot since I planned on rounding the bottom of the feet.
After drilling the first leg, I used it for a jig to drill the holes for the other legs. I would line up the jig leg on top on the next leg and drill the axle hole. Then I would remove the drill bit from the drill press and place the drill bit in the axle hole to pin the two pieces together then drill the connecting rod hole to 3/32 dia. This way I knew that the distances of the holes between all the legs are the same. For the bottom of the leg I put a drill bit through the leg I was using for the jig to mark/center punch the other leg. For the bottom of the legs I wanted round feet so I covered the bottom of the leg with masking tape and using the drill bit mark as a center point. I used a compass and drew a 180 degree arc on the masking tape. Then I used the belt sander to radius the leg taking careful note not to under or over sand the bottom of the foot. When the radius of the foot was sanded I removed the tape & I drilled the hole through. This hole would be used to mount the foam feet later.
Making the Leg Brackets
So I know the diameter of the screwdriver casing therefore I know the length of the brackets for the #1 & #3 legs. I used some steel square tubing to make these & bolted them to the Plexiglas body/frame.
Since the overall weight of the bot was going to be light, I decided to use 8-32 screws as stub-axles vs. an end to end axle like the original uses.
Making the Crank Arms
For the crank arm I decided to use the screw driver bit that fits in the screw driver. The only issue was connecting the screwdriver bit to the crank arm. Out of steel I made the crank arms by drilling two holes, one for the screw driver bit the other for the arm’s axle – which is 8-32 (0.1380) dia. bolt. Here is where I decided to silver solder the screwdriver bit to the arm. Kind of funny that I tie-wrap the motors to the frame but I weld the drive shaft to the crank arm. Again with more thought I could of came up with a non-welding solution but with the welding tanks right there and time as a factor I went for it!
Making the Connecting Rods
For the connecting rods I did a bit of agonizing about how to implement these. I decided to use a 3/32 rod for this. (I could also get 3/32 collars from the hobby shop to hold the rods in their holes in the leg). Any bigger seemed overkill. The length of the rods need to be right on the money but trying to bend a wire with 90 degree angles on one end and some type of loop on the axle ends and get a exact length between the two bends was more than I wanted to figure out, so I tried a couple of different things. Originally I planned on using RC car/airplane ball & sockets on threaded rod end, but having one end be 3/32nd and the end connecting to axle’s 8-32 screw made this kind of difficult to find a heim joint that was for 4-40 threads and a 8-32 through hole.
After thinking about this I came up with the idea shown in the pictures. I could make a single 90 degree bend without any problems this end with the 90 degree bend has to connect to the top of the legs. The other end needs to connect either to the drive axle or the axle of another leg. I decided on using a flat piece of steel with a single hole (big enough to slide on the axle snugly) I decided to make a jig out of wood with two holes in it. One for the 4-40 rod and the other with a 8-32 dia hole in it. By laying a flat piece of steel with a 8-32 clearance hole in it the 3/32 rod would lay on top of it. If I silver soldered the rod to the tab and both were pinned at the exact distance because of the jig, I would end up with a connecting rod the exact length I needed. I had to make a total of six of these. They aren’t the prettiest but they work.
Making
Tie wrapping the motors to the frame. You can barly see the plexiglass in the picture
r570sv
i
IMG_1046.JPGIMG_1079.JPGIMG_1049.JPGIMGP0051.JPG
step 3Assembly
Now with the motors tie-wrapped in, the axle brackets bolted to the Plexiglas frame, the crank arms made, the connecting rods made, the legs cut, it’s time to assemble!
It took some washers here and there, some tweaks to the rods some positioning of the legs on the axles in-line/out of line with the middle leg but I came together nicely.
I hooked up a battery to each of the motors and observed how they rotated and to make sure nothing was binding or grinding. It took some adjustments of the axle legs & washers to get it all correct. Because of the length of the screwdriver bit & crank arm attachment the arms are further out from the frame than I originally thought. But of course I never bothered to figure this out in the first place and it all worked out.
Assembly
Close up of the crank arm and control arms
r570sv
i
step 4The Feet
One of the problems with this robot IMHO is traction. The Taymiya robot struggles on a smooth surface to walk and will do much better on carpet. I knew I had to come up with some kind of foot for the robot and tried to find at least an initial solution at the hardware store. What I ended up with was 2 ½ foam pipe insulation. Not what I was looking for, but a start. The diameter of the foam tubing was bigger that I wanted but I cut some of it out and stuck it together. I filled the center up with some additional foam bits to keep it from smushing apart when I pressed the washer onto it. I found some large ½ washers that are 2” diameter. I had to use an additional ¼-20 washer to keep the 8-32 screw from falling through. I managed to drill and tap the feet vs. drilling a through hold and bolting them up. Risky because I could have split the Plexiglas doing this but it worked out.
The Feet
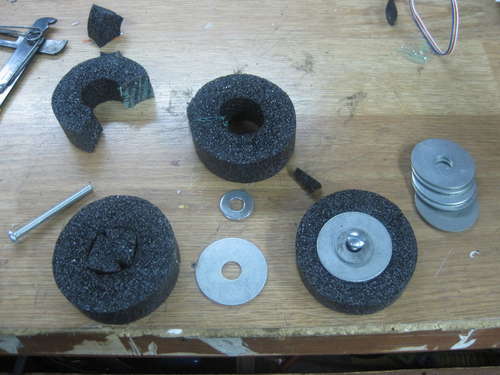
i
IMG_1058.JPGIMG_1059.JPG
step 5The Controller
I decided to do something similar to the original Taymiya kit so I decided to make a controller from some of the left over Plexiglas. I could of went with a hobby box and made it easy but I figured with a jig saw, belt sander & super glue I could come up with something pretty quickly.
I was going to need two DPDT momentary switches for the joy sticks. Fortunately my local electrical computer place had what I needed. I’ve included a very lame picture of the wiring diagram.

To drive the bot I decide to use three Sub-C Nimh batteries that I bought off of eBay years back. I soldered the pack together and used a small RC car connector so I could disconnect the pack to charge the battery.
Picture of wiring diagram.
The Controller
image not found
loading...
i
IMG_1068.JPGbot wiring diagram.JPG
step 6Testing
step 7Summary
Well it walks! Pretty much in a similar manner as the smaller one. I need to add some weight to it to see if it behaves better/different.
Observations -
The foam feet don’t work. They flatten out pretty quickly and the Plexiglas feet are banging on the ground. I need to get some thick rubber material that won’t flatten and get better traction. I will try to find some rubber disks or something off the internet.
Adding a motor controller. Right now it’s only one speed. I would like to see how it walks/behaves when the legs are moving slower. This will require me moving to some type of RC dual motor controller to implement.
Next Steps
1. Fix the feet
2. Add a motor controller of some type.
3. Shorten the distance between the #1 & #3 legs (basically shorten the overall length of the robot). I want to shorten the distance so that the #1 & #3 legs actually move inside the center leg’s walking radius. I can do this by staggering how the legs line up (from a front to back view). This will require moving the axle brackets towards the center and probably re-making the connecting rods – now maybe I will take the time to figure out a non-welding solution for this (suggestions welcome!).
Overview
Take the Taymiya six legged walker robot and make a larger version of it. Ultimately I’m deciding if I want to make a bot large enough that two people can ride and drive in.
See (rpantaleo [ندعوك للتسجيل في المنتدى أو التعريف بنفسك لمعاينة هذا الرابط] for a large version of this kind of bot.
One thing I wanted to determine is that if you increase the size of the robot, how it behaves compared to the original. The Taymiya bot is I have to admit pretty lame when it comes to a practical walker. I wanted to see how a larger bot behaved. Another important data point I was looking is – increasing the size makes for a VERY long robot very quickly and not practical for a very large version of the bot that could fit through the side gate in the back yard and still carry two people in some manner.
Once this is complete the next version I plan on doing is seeing what happens if I shorten the distance between the legs (shorten the length of the bot), how does it behave. Of course I could do all this in a CAD program but I’ve gone low tech on this and did it all with pencil and paper and just building it to find out.
I originally set out to do this without having to weld anything. But when it came to making the linkage arms to an exact length and the crank arm I punted and ended up silver soldering these components. I’m sure If I thought about it longer I would of came up with a solution but total build time was an important driver in all of this and I wanted to complete this quickly before it became yet another half completed project cluttering up the garage.
I also chose to use a hand held controller wired to the bot in similar to what comes with the model. I could of easily used spare RC parts but I chose to keep with the spirit of the original and going back to my original theme of using this as a proof of concept I chose to keep it simple.
Six Legged Walking Robot
image not found
loading...
This picture makes the bot look like it has wheels! But you can see how much bigger - 4x bigger - than the original
r570sv
i
step 1Design
So futzing with the dimensions of the robot I wanted to keep the size to something that I could build on the work bench. Also I was planning on using some very inexpensive 3.6V electric screwdriver motors for the project so any overall size I came up with had to be within the capabilities of the screwdriver motors to drive it. After crunching some numbers and eyeballing things I chose to make mine 4x times larger than the original.
So what I did is - as best as I could, using a pair of dial calipers – was to measure all of the lengths of all of the components. Then I measured them all again, then I measured them all again. My measurements I believe are close but not 100% accurate. Since I was eye-balling some what I did is take two or three measurements of the same item and averaged the lengths. Some of the easier measurements I did multiple times I ended up with the same distance. For anything that was off, I was wondering what would happen when I multiply the inaccuracy – would the legs bind, would it fall over or not walk at all.
Design
I measured at least 3 times to make sure I was as accurate as I could be. Any error was going to be magnified 4x times on the new bot.
r570sv
i
IMG_1084.JPGIMG_1076.JPGIMG_1075.JPG
step 2Making
Making the base
Making the base only required drilling the holes for the tie wraps to hold the motors in place and the four holes for the leg brackets. Pretty straight forward.
Making the Legs
For the legs I cut six lengths of 2” wide Plexiglas to a length slightly longer than the overall leg (6.320). In the first leg I drilled three holes per my measurements. One for connecting rod, one for the axle center & one hole that is a center point for a 1” radius that would be the center point for the bottom of the foot since I planned on rounding the bottom of the feet.
After drilling the first leg, I used it for a jig to drill the holes for the other legs. I would line up the jig leg on top on the next leg and drill the axle hole. Then I would remove the drill bit from the drill press and place the drill bit in the axle hole to pin the two pieces together then drill the connecting rod hole to 3/32 dia. This way I knew that the distances of the holes between all the legs are the same. For the bottom of the leg I put a drill bit through the leg I was using for the jig to mark/center punch the other leg. For the bottom of the legs I wanted round feet so I covered the bottom of the leg with masking tape and using the drill bit mark as a center point. I used a compass and drew a 180 degree arc on the masking tape. Then I used the belt sander to radius the leg taking careful note not to under or over sand the bottom of the foot. When the radius of the foot was sanded I removed the tape & I drilled the hole through. This hole would be used to mount the foam feet later.
Making the Leg Brackets
So I know the diameter of the screwdriver casing therefore I know the length of the brackets for the #1 & #3 legs. I used some steel square tubing to make these & bolted them to the Plexiglas body/frame.
Since the overall weight of the bot was going to be light, I decided to use 8-32 screws as stub-axles vs. an end to end axle like the original uses.
Making the Crank Arms
For the crank arm I decided to use the screw driver bit that fits in the screw driver. The only issue was connecting the screwdriver bit to the crank arm. Out of steel I made the crank arms by drilling two holes, one for the screw driver bit the other for the arm’s axle – which is 8-32 (0.1380) dia. bolt. Here is where I decided to silver solder the screwdriver bit to the arm. Kind of funny that I tie-wrap the motors to the frame but I weld the drive shaft to the crank arm. Again with more thought I could of came up with a non-welding solution but with the welding tanks right there and time as a factor I went for it!
Making the Connecting Rods
For the connecting rods I did a bit of agonizing about how to implement these. I decided to use a 3/32 rod for this. (I could also get 3/32 collars from the hobby shop to hold the rods in their holes in the leg). Any bigger seemed overkill. The length of the rods need to be right on the money but trying to bend a wire with 90 degree angles on one end and some type of loop on the axle ends and get a exact length between the two bends was more than I wanted to figure out, so I tried a couple of different things. Originally I planned on using RC car/airplane ball & sockets on threaded rod end, but having one end be 3/32nd and the end connecting to axle’s 8-32 screw made this kind of difficult to find a heim joint that was for 4-40 threads and a 8-32 through hole.
After thinking about this I came up with the idea shown in the pictures. I could make a single 90 degree bend without any problems this end with the 90 degree bend has to connect to the top of the legs. The other end needs to connect either to the drive axle or the axle of another leg. I decided on using a flat piece of steel with a single hole (big enough to slide on the axle snugly) I decided to make a jig out of wood with two holes in it. One for the 4-40 rod and the other with a 8-32 dia hole in it. By laying a flat piece of steel with a 8-32 clearance hole in it the 3/32 rod would lay on top of it. If I silver soldered the rod to the tab and both were pinned at the exact distance because of the jig, I would end up with a connecting rod the exact length I needed. I had to make a total of six of these. They aren’t the prettiest but they work.
Making
Tie wrapping the motors to the frame. You can barly see the plexiglass in the picture
r570sv
i
IMG_1046.JPGIMG_1079.JPGIMG_1049.JPGIMGP0051.JPG
step 3Assembly
Now with the motors tie-wrapped in, the axle brackets bolted to the Plexiglas frame, the crank arms made, the connecting rods made, the legs cut, it’s time to assemble!
It took some washers here and there, some tweaks to the rods some positioning of the legs on the axles in-line/out of line with the middle leg but I came together nicely.
I hooked up a battery to each of the motors and observed how they rotated and to make sure nothing was binding or grinding. It took some adjustments of the axle legs & washers to get it all correct. Because of the length of the screwdriver bit & crank arm attachment the arms are further out from the frame than I originally thought. But of course I never bothered to figure this out in the first place and it all worked out.
Assembly
Close up of the crank arm and control arms
r570sv
i
step 4The Feet
One of the problems with this robot IMHO is traction. The Taymiya robot struggles on a smooth surface to walk and will do much better on carpet. I knew I had to come up with some kind of foot for the robot and tried to find at least an initial solution at the hardware store. What I ended up with was 2 ½ foam pipe insulation. Not what I was looking for, but a start. The diameter of the foam tubing was bigger that I wanted but I cut some of it out and stuck it together. I filled the center up with some additional foam bits to keep it from smushing apart when I pressed the washer onto it. I found some large ½ washers that are 2” diameter. I had to use an additional ¼-20 washer to keep the 8-32 screw from falling through. I managed to drill and tap the feet vs. drilling a through hold and bolting them up. Risky because I could have split the Plexiglas doing this but it worked out.
The Feet
i
IMG_1058.JPGIMG_1059.JPG
step 5The Controller
I decided to do something similar to the original Taymiya kit so I decided to make a controller from some of the left over Plexiglas. I could of went with a hobby box and made it easy but I figured with a jig saw, belt sander & super glue I could come up with something pretty quickly.
I was going to need two DPDT momentary switches for the joy sticks. Fortunately my local electrical computer place had what I needed. I’ve included a very lame picture of the wiring diagram.
To drive the bot I decide to use three Sub-C Nimh batteries that I bought off of eBay years back. I soldered the pack together and used a small RC car connector so I could disconnect the pack to charge the battery.
Picture of wiring diagram.
The Controller
image not found
loading...
i
IMG_1068.JPGbot wiring diagram.JPG
step 6Testing
step 7Summary
Well it walks! Pretty much in a similar manner as the smaller one. I need to add some weight to it to see if it behaves better/different.
Observations -
The foam feet don’t work. They flatten out pretty quickly and the Plexiglas feet are banging on the ground. I need to get some thick rubber material that won’t flatten and get better traction. I will try to find some rubber disks or something off the internet.
Adding a motor controller. Right now it’s only one speed. I would like to see how it walks/behaves when the legs are moving slower. This will require me moving to some type of RC dual motor controller to implement.
Next Steps
1. Fix the feet
2. Add a motor controller of some type.
3. Shorten the distance between the #1 & #3 legs (basically shorten the overall length of the robot). I want to shorten the distance so that the #1 & #3 legs actually move inside the center leg’s walking radius. I can do this by staggering how the legs line up (from a front to back view). This will require moving the axle brackets towards the center and probably re-making the connecting rods – now maybe I will take the time to figure out a non-welding solution for this (suggestions welcome!).
المدير العام- عضو ممتاز
-
.....
الباحث عن الحقيقة
.....
****************************
---------------------------------------
----------------------------------------
عدد الرسائل : 4202
العمر : 65
العمل : باحث وكاتب في العلوم ومقارنة الآديان
تاريخ التسجيل : 13/08/2008 -
رد: كيف تصنع طائرة من كوب قهوة ؟؟ Paper coffee cup flying & controlled models of hovercrafts
من طرف نادية كامل الخميس يوليو 21, 2011 7:45 am
شكرا لك
نادية كامل- لا يوجد
عدد الرسائل : 6
العمر : 57
العمل : معلمة
تاريخ التسجيل : 14/07/2011
» الورق Paper
» كتاب حكايات قهوة كتكوت
» البن ...........Coffee ................Gymnocladus dioicus
» Flying Fish
» التقنية وحدها لا تصنع ثورة
» كتاب حكايات قهوة كتكوت
» البن ...........Coffee ................Gymnocladus dioicus
» Flying Fish
» التقنية وحدها لا تصنع ثورة
منتديات العلم والعلماء والمخترعين والمبتكرين .... :: منتدي الإختراعات والإبتكارات Inventions and innovations
صفحة 1 من اصل 1
صلاحيات هذا المنتدى:
لاتستطيع الرد على المواضيع في هذا المنتدى